
How to Create a Health Dashboard with Flask and Terra
How to Create a Health Dashboard with Flask and Terra
In this article, we will be using Python and Flask to create a dashboard for your wearable health data.
We will consume data from the Terra Webhook, and import glucose and activity heart rate graphs from the Terra Graph API. We'll store our health data with Flask-SQLAlchemy in an SQLite database, and display it on an HTML page with Bootstrap styling.
Here is an image of the web application we are going to build:

Step 1 - Obtain Your Credentials from The Terra Dashboard
To communicate with a wearable through the Terra API, you need the following:
- Your API Key
- Your Dev ID
Go to your Terra Dashboard, under Connections, you will find your API Key and Dev ID in the bottom right corner in the API Credentials Popup. They are used in virtually every interaction with the API - keep them safe!
Step 2 - Create a Flask Webhook Consumer and Serve it with Ngrok
Create a virtual environment and activate it:
python -m venv env
source env/bin/activate
Install the necessary packages:
pip install Flask Flask-SQLAlchemy terra-python
The terra-python package is a wrapper for the Terra endpoints and models. We'll use it to verify and authenticate incoming webhook data.
Next, create a small Flask app file called app.py:
import logging
from flask import Flask, Response, request, render_template
from terra.base_client import Terra

logging.basicConfig(level=logging.INFO)
_LOGGER = logging.getLogger("app")

terra = Terra(api_key='<API-KEY>',
              dev_id='<DEV-ID>',
              secret='<SIGNING-SECRET>')

app = Flask(__name__)

@app.route("/", methods=["GET", "POST"])
def consume_terra_webhook() -> Response:
    if request.method == 'POST':
        # Get data from the Terra Webhook
        body = request.get_json()

        # Log that the Webhook was received
        _LOGGER.info(
            "Received webhook for user %s of type %s",
            body.get("user", {}).get("user_id"),
            body["type"])

        # Just a health check, return 200
        if body["type"] == 'healthcheck':
            return Response(status=200)

        # Verify Terra Signature
        verified = terra.check_terra_signature(request.get_data().decode("utf-8"),
                                            request.headers['terra-signature'])

        # The data is verified
        if verified:
            return Response(status=200)

        else:
            return Response(status=403)

    # Handle GET requests
    if request.method == 'GET':
        return render_template('index.html')

if __name__ == "__main__":
    app.run(host="localhost", port=8080)
Make sure to fill in <API-KEY> and <DEV-ID> with your API key and developer ID. The signing secret will be added later in this article.
This simple Flask web application serves as a webhook endpoint for Terra.
The code performs the following:
- Initializes logging with INFO level.
- Initializes a Terra client with the provided API key, and developer ID.
- Creates a Flask web application instance
app. - Defines a route ("/") that handles both GET and POST requests.
In the consume_terra_webhook() function, you have two conditions, one for handling POST requests and one for GET requests.
If the request is a POST request, this means that the Terra API has sent some data through a Webhook. So, the code does the following:
- Retrieves JSON data from the request body.
- Logs information about the received webhook, including user ID and data type.
- If the webhook type is a "healthcheck" respond with a 200 status.
- Verifies the Terra signature by comparing it with the calculated signature using the
check_terra_signature()method. This will not work for now, as we haven't yet added a signing secret. - In the
if verified:condition, the signature is verified, so we respond with a 200 status for now; you will later modify this part of the code, so that it inserts data into a database. We will also respond with an HTTP 201 status code instead of 200 to signify that a resource was added to the server. - If the signature is not verified, respond with a HTTP 403 FORBIDDEN status.
On the other hand, if the request is a GET request, the code renders an index.html template.
Now, create a templates folder inside your Flask app's directory and create a new index.html file inside it:
<!DOCTYPE html>
<html lang="en">
<head>
<meta charset="UTF-8">
<meta name="viewport" content="width=device-width, initial-scale=1.0">
<title>Terra Health Dashboard</title>
<link href="//maxcdn.bootstrapcdn.com/bootstrap/4.1.1/css/bootstrap.min.css" rel="stylesheet" id="bootstrap-css">
<script src="//maxcdn.bootstrapcdn.com/bootstrap/4.1.1/js/bootstrap.min.js"></script>
<script src="//cdnjs.cloudflare.com/ajax/libs/jquery/3.2.1/jquery.min.js"></script>
</head>
<body>
<div class="container">
<div class="container-fluid">
<h1>Terra Health Dashboard</h1>
<!--Glucose Graph-->
<iframe src="<https://api.tryterra.co/v2/graphs/13250842-43ef-42cd-a3d6-4fe9096de360/dummy_data?timeframe=7>"
style="border:none;"
height="350"
width="500"
title="Average Glucose"></iframe>
<!--Workout Heart Rate Graph-->
<iframe src="<https://api.tryterra.co/v2/graphs/752516cb-3f89-4a75-b880-9827615ca6e2/dummy_data?timeframe=7>"
style="border:none;"
height="350"
width="500"
title="Workout Heart Rate"></iframe>
<div class="row">
<!-- Icon Cards-->
<div class="col-lg-4 col-md-4 col-sm-6 col-12 mb-2 mt-4">
<div class="inforide">
<div class="row">
<div class="col-lg-9 col-md-8 col-sm-8 col-8 fontsty">
<h1>🏃♂️ Activity</h1>
<hr>
<h4>Total Minutes</h4>
<h1>(((minutes)))</h1>
</div>
</div>
</div>
</div>
<div class="col-lg-4 col-md-4 col-sm-6 col-12 mb-2 mt-4">
<div class="inforide">
<div class="row">
<div class="col-lg-9 col-md-8 col-sm-8 col-8 fontsty">
<h1> 🚶♀️ Steps</h1>
<hr>
<h1>(((steps)))</h1>
</div>
</div>
</div>
</div>
<div class="col-lg-4 col-md-4 col-sm-6 col-12 mb-2 mt-4">
<div class="inforide">
<div class="row">
<div class="col-lg-9 col-md-8 col-sm-8 col-8 fontsty">
<h1>🫀 Heart</h1>
<hr>
<h4>Average Heart Rate (bpm)</h4>
<h1>(((avg_hr_bpm)))</h1>
</div>
</div>
</div>
</div>
<div class="col-lg-4 col-md-4 col-sm-6 col-12 mb-2 mt-4">
<div class="inforide">
<div class="row">
<div class="col-lg-9 col-md-8 col-sm-8 col-8 fontsty">
<h1>🍽️ Nutrition</h1>
<hr>
<h4>Calories</h4>
<h1>(((calories)))</h1>
</div>
</div>
</div>
</div>
</div>
</div>
</div>
</body>
</html>
In the preceding code, you have the following components:
- External Bootstrap CSS and JS libraries are linked for styling.
- Two
<iframes>displaying graphs from Terra for Glucose and Workout Heart Rate. - Four sections that display different health data points, each one with a placeholder that will be later modified:
- 🏃♂️ Activity:
(((minutes))) - 🚶♀️ Steps:
(((steps))) - 🫀 Heart:
(((avg_hr_bpm))) - 🍽️ Nutrition:
(((calories)))
- 🏃♂️ Activity:
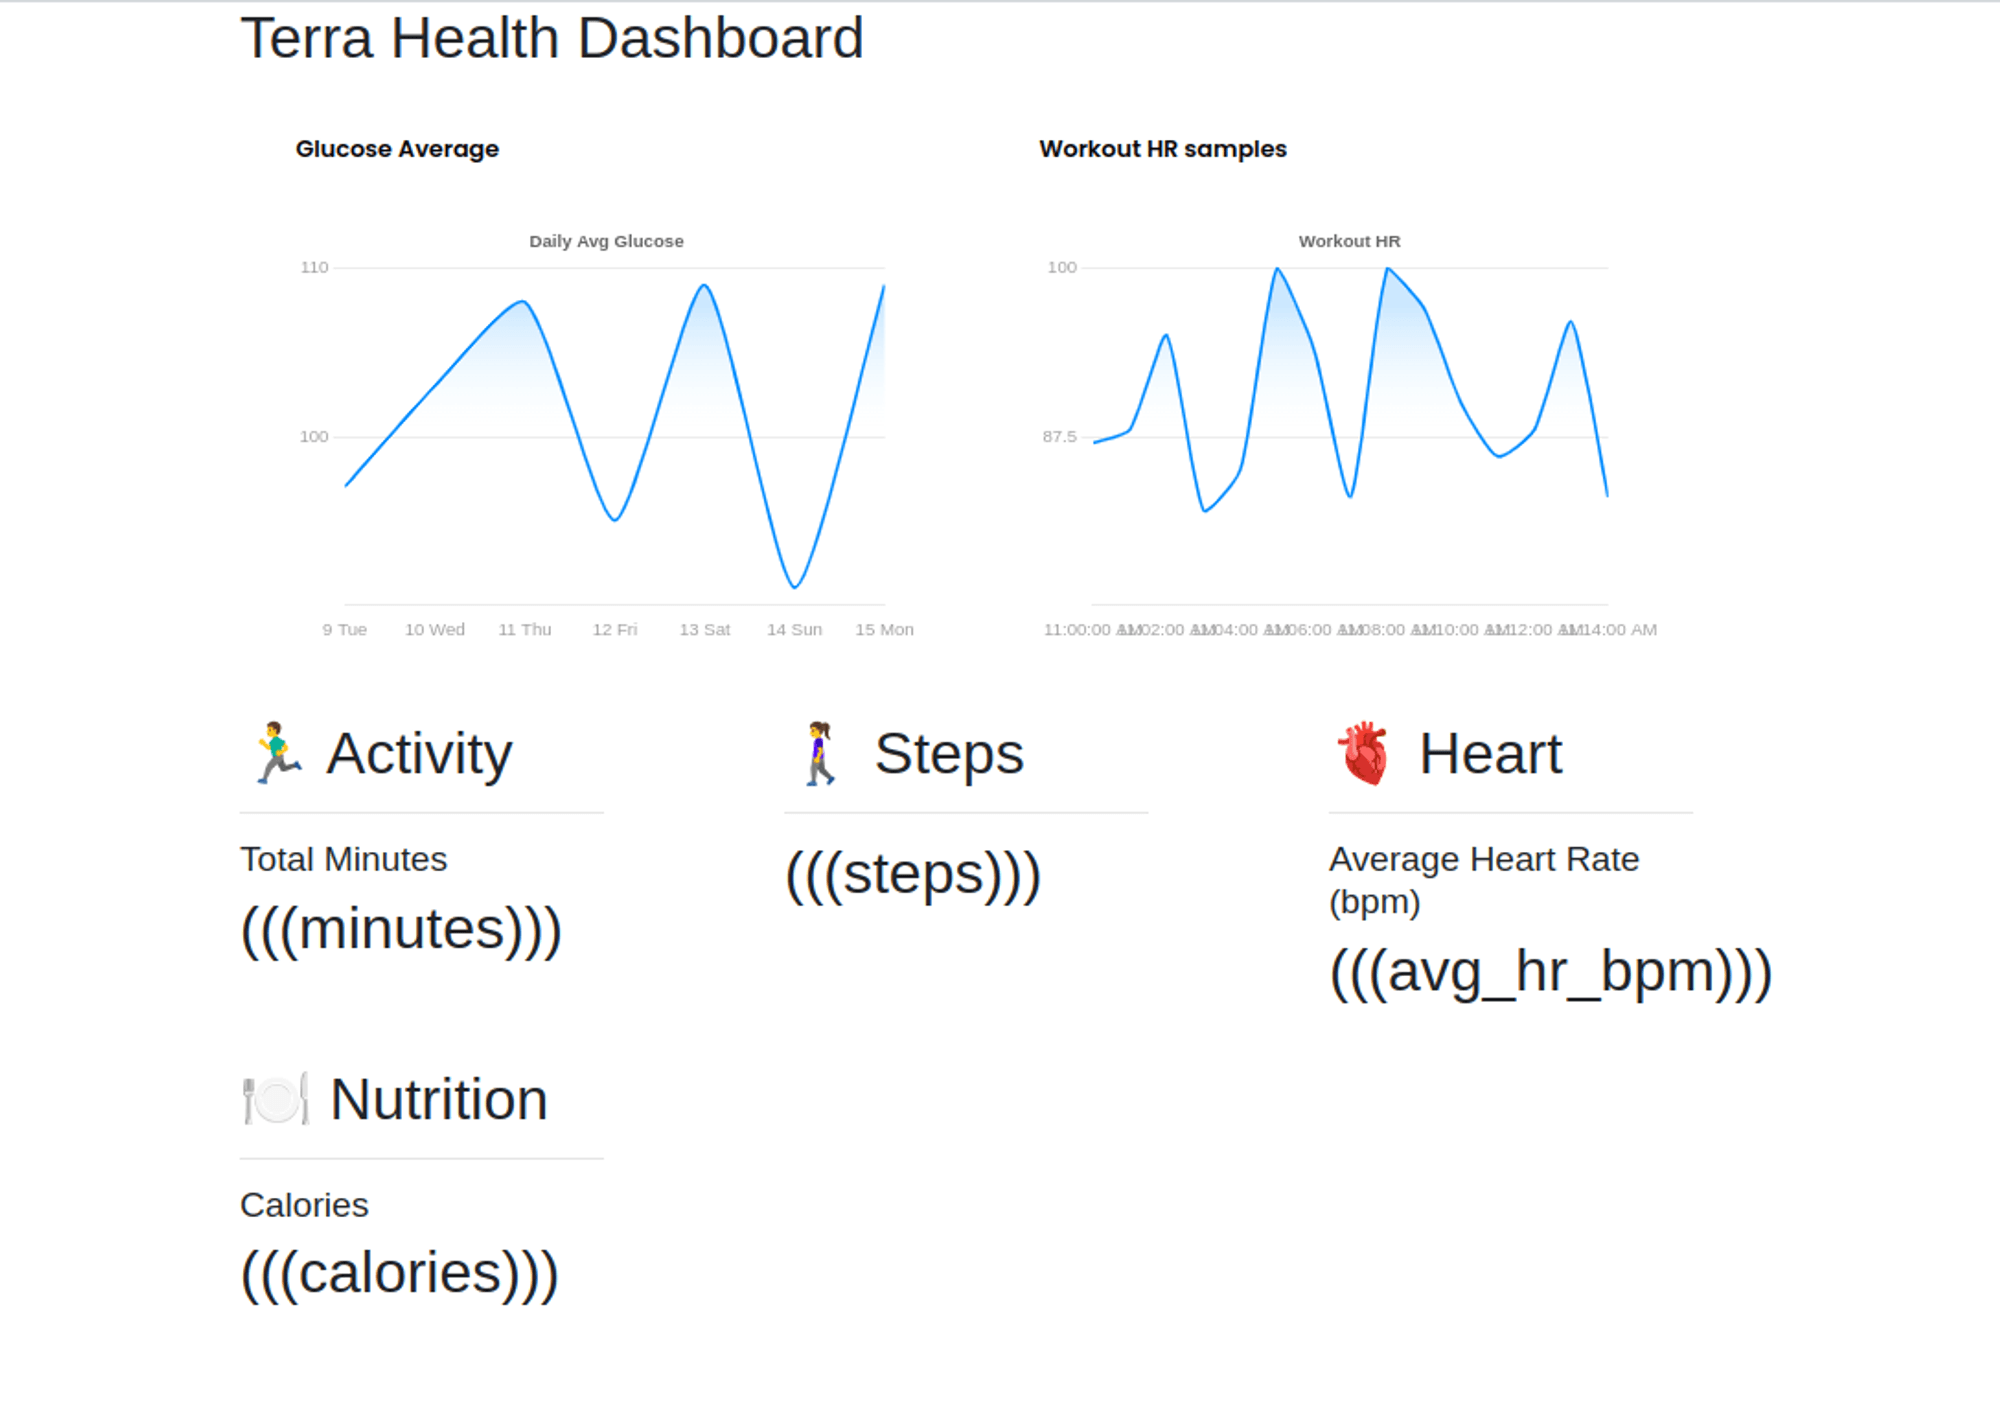
The <iframe> graphs are from the Graph API. To get your own URL and use it in the src attribute. Go to the Terra GraphAPI Dashboard, and click Create Graph. Then, choose Activity HR Samples from the Graph Type drop down menu, then click Create. Next, add another Body Glucose Summary graph using the same process. You can then copy the URLs and add them to your index.html file.
Notes: If you want to generate other graphs, you can just describe them and Terra's magic AI will create them for you :)
Next run the application on port 8080:
flask --app app run -p 8080
As Terra cannot send Webhook data to your local development server, you have to expose your server to the Internet using Ngrok. To install it, check out this page.
Once you install Ngrok, create an account, then obtain your authentication token from the Ngrok dashboard. Once you get your authtoken, add it to your Ngrok agent using the following command:
ngrok config add-authtoken <TOKEN>
This will allow you to access some features such as rendering HTML files.
Once you set up Ngrok, use it to expose your Flask application that is currently running on port 8080:
ngrok http 8080
This command will give you a URL under Forwarding. Use your browser to access this URL, you should see your index page with the graphs you generated earlier:
Copy your Ngrok URL. This is your Server URL, and you will use it to connect to a Terra Webhook in the next step.
Step 3 - Connect a Terra Webhook with Your Server
You will now connect a test wearable with your Flask app.
Note: We will use FitBit in this demo.
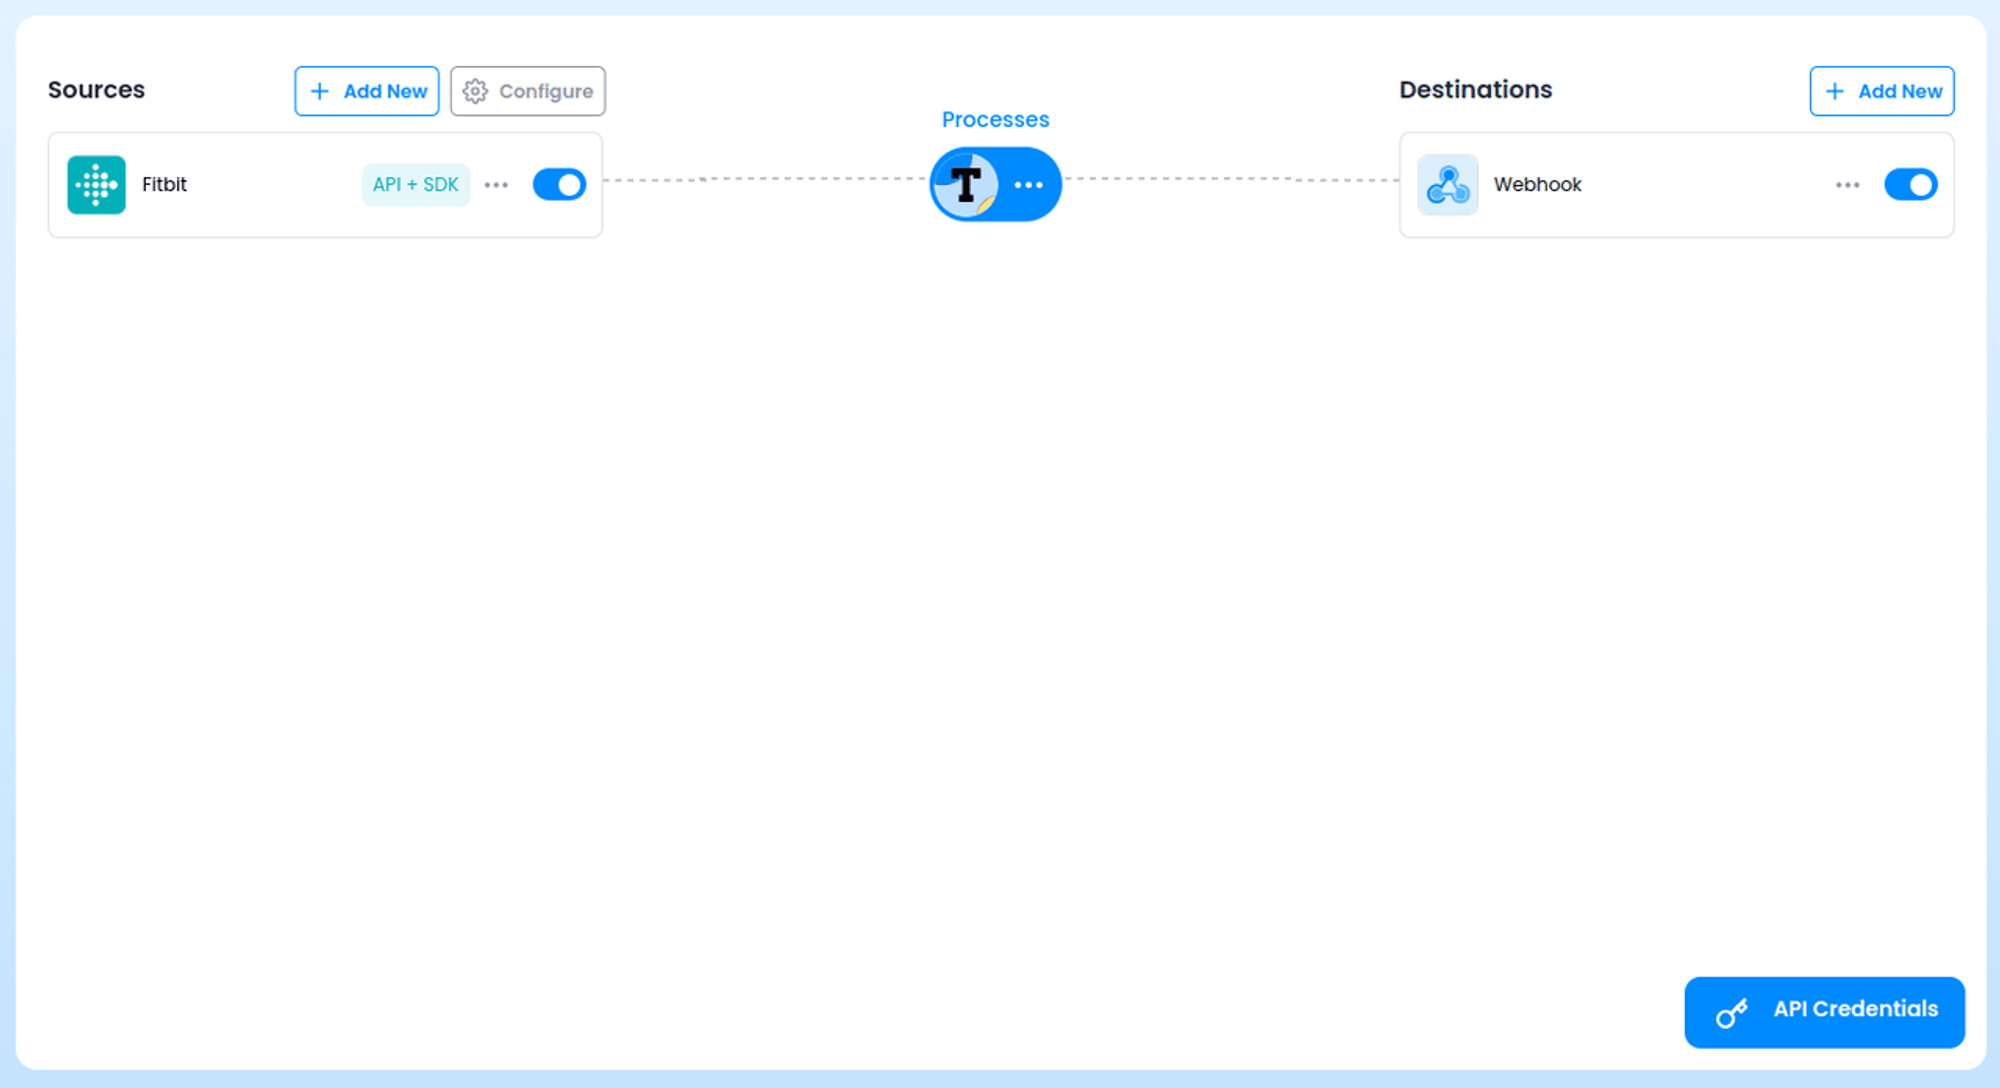
Go to your Terra Dashboard, then in Connections. Under Sources, click Add Sources, and select Fitbit, then Save.
Next, under Destinations click Add Destination, then select Webhook, then Next.
Put your Ngrok Server URL under host.
The Connections dashboard should now look like so:
Now, you need to obtain your Signing secret. Click the three dots to the right of Webhook then Edit.
Copy the Signing secret. This is needed to authenticate and verify Webhook requests.
To use your Webhook's signing secret, modify the secret parameter in your Terra initiation inside your app.py Flask application:
terra = Terra(api_key='<API-KEY>',
              dev_id='<DEV-ID>',
              secret='<PASTE-SIGNING-SECRET-HERE>')
Once modified, remember to rerun your Flask app:
flask --app app run -p 8080
Note: Make sure Ngrok is still running. If you've stopped it and restarted it, your Server URL will change, so make sure to edit the Webhook host in your Terra Dashboard and replace the old Ngrok URL with the new one.
We will now test the Webhook connection. In the Terra Dashboard, go to Tools > Generate > Select Data Source > Fitbit.
Then click on Daily, then click Generate test data.
Once data is generated. Click Send to Webhook.
Go back to your Flask server and wait for a few seconds. You should see the following message in the logs:
INFO:app:Received webhook for user <Your User ID> of type daily
INFO:werkzeug:127.0.0.1 - - [16/Jan/2024 11:21:23] "POST / HTTP/1.1" 200 -
This means you have successfully connected a Terra Webhook with your Flask application and you are receiving data! Next, you'll modify app.py to store the data inside an SQLite database.
Step 4 - Storing Health Data in an SQLite Database
Now that you are receiving wearable data from the Terra Webhook, you can use Flask-SQLAlchemy to store this data in an SQL database. We will use an SQLite database in this demonstration.
Open your app.py file and modify it by importing and setting up Flask-SQLAlchemy, then adding a new Health database model, so that everything above the @app.route("/", methods=["GET", "POST"]) line looks as follows:
# app.py

import logging
from flask import Flask, Response, request, render_template
from flask_sqlalchemy import SQLAlchemy

from terra.base_client import Terra

logging.basicConfig(level=logging.INFO)
_LOGGER = logging.getLogger("app")

terra = Terra(api_key='<API-KEY>',
              dev_id='<DEV-ID>',
              secret='<SIGNING-SECRET>')
app = Flask(__name__)

app.config['SQLALCHEMY_DATABASE_URI'] = 'sqlite:///app.db'

db = SQLAlchemy(app)

class Health(db.Model):
    __tablename__ = 'health_data'
    id = db.Column(db.Integer, primary_key=True)
    minutes = db.Column(db.Integer)
    steps = db.Column(db.Integer)
    avg_hr_bpm = db.Column(db.Integer)
    calories = db.Column(db.Integer)
Save and close the file.
Here, you set up a database URI that will point to an SQLite database called app.db. This database file will be created inside a new instance folder that will be automatically added to your Flask project folder.
You also add a Flask-SQLAlchemy database model that represents a table called Health with the following columns:
id: Record ID.minutes: Total activity minutes.steps: Total steps.avg_hr_bpm: Average heart rate (bpm).calories: Total calories consumed.
Next, inside your Flask application folder, with your environment activated, open the Flask Shell to create the database file and Health data table:
flask shell
>>> from app import db, Health
>>> db.create_all()
>>> exit()
You should see a new app.db file inside an instance folder in your Flask project folder.
Next, modify the if verified condition code in your app.py, where you handle POST requests, from this:
# ...
        # The data is verified
        if verified:
            return Response(status=200)
To this:
# ....
        # The data is verified
        if verified:
            health_data = Health()
            health_data.minutes = int(body['data'][0]['active_durations_data']\\\\
                                                    ['activity_seconds']/60)

            health_data.steps   = int(body['data'][0]['distance_data']['steps'])

            health_data.avg_hr_bpm = int(body['data'][0]['heart_rate_data']\\\\
                                                    ['summary']\\\\
                                                    ['avg_hr_bpm'])

            health_data.calories = int(body['data'][0]['calories_data']\\\\
                                                    ['BMR_calories'])

            _LOGGER.info("Adding health data to the database...")

            db.session.add(health_data)
            db.session.commit()

            return Response(status=201)
Here, you create a Health() instance, populate it with data from the Terra Webhook, and then insert it into the database as a new record.
The full file should now be like this:
# app.py

import logging
from flask import Flask, Response, request, render_template
from flask_sqlalchemy import SQLAlchemy

from terra.base_client import Terra

logging.basicConfig(level=logging.INFO)
_LOGGER = logging.getLogger("app")

terra = Terra(api_key='<API-KEY>',
              dev_id='<DEV-ID>',
              secret='<SIGNING-SECRET>')

app = Flask(__name__)

app.config['SQLALCHEMY_DATABASE_URI'] = 'sqlite:///app.db'

db = SQLAlchemy(app)

class Health(db.Model):
    __tablename__ = 'health_data'
    id = db.Column(db.Integer, primary_key=True)
    minutes = db.Column(db.Integer)
    steps = db.Column(db.Integer)
    avg_hr_bpm = db.Column(db.Integer)
    calories = db.Column(db.Integer)

@app.route("/", methods=["GET", "POST"])
def consume_terra_webhook() -> Response:
    if request.method == 'POST':
        # Get data from the Terra Webhook
        body = request.get_json()

        # Log that the Webhook was received
        _LOGGER.info(
            "Received webhook for user %s of type %s",
            body.get("user", {}).get("user_id"),
            body["type"])

        # Just a health check, return 200
        if body["type"] == 'healthcheck':
            return Response(status=200)

        # Verify Terra Signature
        verified = terra.check_terra_signature(request.get_data().decode("utf-8"),
                                            request.headers['terra-signature'])

        # The data is verified
        if verified:
            health_data = Health()
            health_data.minutes = int(body['data'][0]['active_durations_data']\\\\
                                                    ['activity_seconds']/60)

            health_data.steps   = int(body['data'][0]['distance_data']['steps'])

            health_data.avg_hr_bpm = int(body['data'][0]['heart_rate_data']\\\\
                                                    ['summary']\\\\
                                                    ['avg_hr_bpm'])

            health_data.calories = int(body['data'][0]['calories_data']\\\\
                                                    ['BMR_calories'])

            _LOGGER.info("Adding health data to the database...")

            db.session.add(health_data)
            db.session.commit()

            return Response(status=201)

        else:
            return Response(status=403)

    # Handle GET requests
    if request.method == 'GET':
        return render_template('index.html')

if __name__ == "__main__":
    app.run(host="localhost", port=8080)
To test that this new added code works, go back to the Terra Dashboard, generate new data, then click Send to Webhook.
Note: You may need to restart your Flask server.
You should see the following two lines in your Flask server logs:
INFO:app:Adding health data to the database...
INFO:werkzeug:127.0.0.1 - - [16/Jan/2024 18:14:41] "POST / HTTP/1.1" 201 -
With the wearable data now stored inside our database, we can modify our Flask application to fetch this data from the database and display it on the index page.
Step 5 - Fetching Health Data and Displaying it
To display our wearable data on the Terra dashboard in the index.html file, we will modify the part of code that handles GET requests.
Open app.py, then modify the GET request handler from this:
    # Handle GET requests
    if request.method == 'GET':
        return render_template('index.html')
To this:
# Handle GET requests
    if request.method == 'GET':
        health_data = Health.query.order_by(Health.id.desc()).first()

        return render_template('index.html',
                               minutes=health_data.minutes,
                               steps=health_data.steps,
                               avg_hr_bpm=health_data.avg_hr_bpm,
                               calories=health_data.calories
                               )
In the preceding code, you get the latest health data, and pass each of its components to the index.html file.
Next, modify the ((( _ ))) placeholders in the index.html to display their respective values using the {{ _ }} syntax:
<div class="row">
<!-- Icon Cards-->
<div class="col-lg-4 col-md-4 col-sm-6 col-12 mb-2 mt-4">
<div class="inforide">
<div class="row">
<div class="col-lg-9 col-md-8 col-sm-8 col-8 fontsty">
<h1>🏃♂️ Activity</h1>
<hr>
<h4>Total Minutes</h4>
<h1>{{minutes}}</h1>
</div>
</div>
</div>
</div>
<div class="col-lg-4 col-md-4 col-sm-6 col-12 mb-2 mt-4">
<div class="inforide">
<div class="row">
<div class="col-lg-9 col-md-8 col-sm-8 col-8 fontsty">
<h1> 🚶♀️ Steps</h1>
<hr>
<h1>{{steps}}</h1>
</div>
</div>
</div>
</div>
<div class="col-lg-4 col-md-4 col-sm-6 col-12 mb-2 mt-4">
<div class="inforide">
<div class="row">
<div class="col-lg-9 col-md-8 col-sm-8 col-8 fontsty">
<h1>🫀 Heart</h1>
<hr>
<h4>Average Heart Rate (bpm)</h4>
<h1>{{avg_hr_bpm}}</h1>
</div>
</div>
</div>
</div>
<div class="col-lg-4 col-md-4 col-sm-6 col-12 mb-2 mt-4">
<div class="inforide">
<div class="row">
<div class="col-lg-9 col-md-8 col-sm-8 col-8 fontsty">
<h1>🍽️ Nutrition</h1>
<hr>
<h4>Calories</h4>
<h1>{{calories}}</h1>
</div>
</div>
</div>
</div>
</div>
Save and close the file.
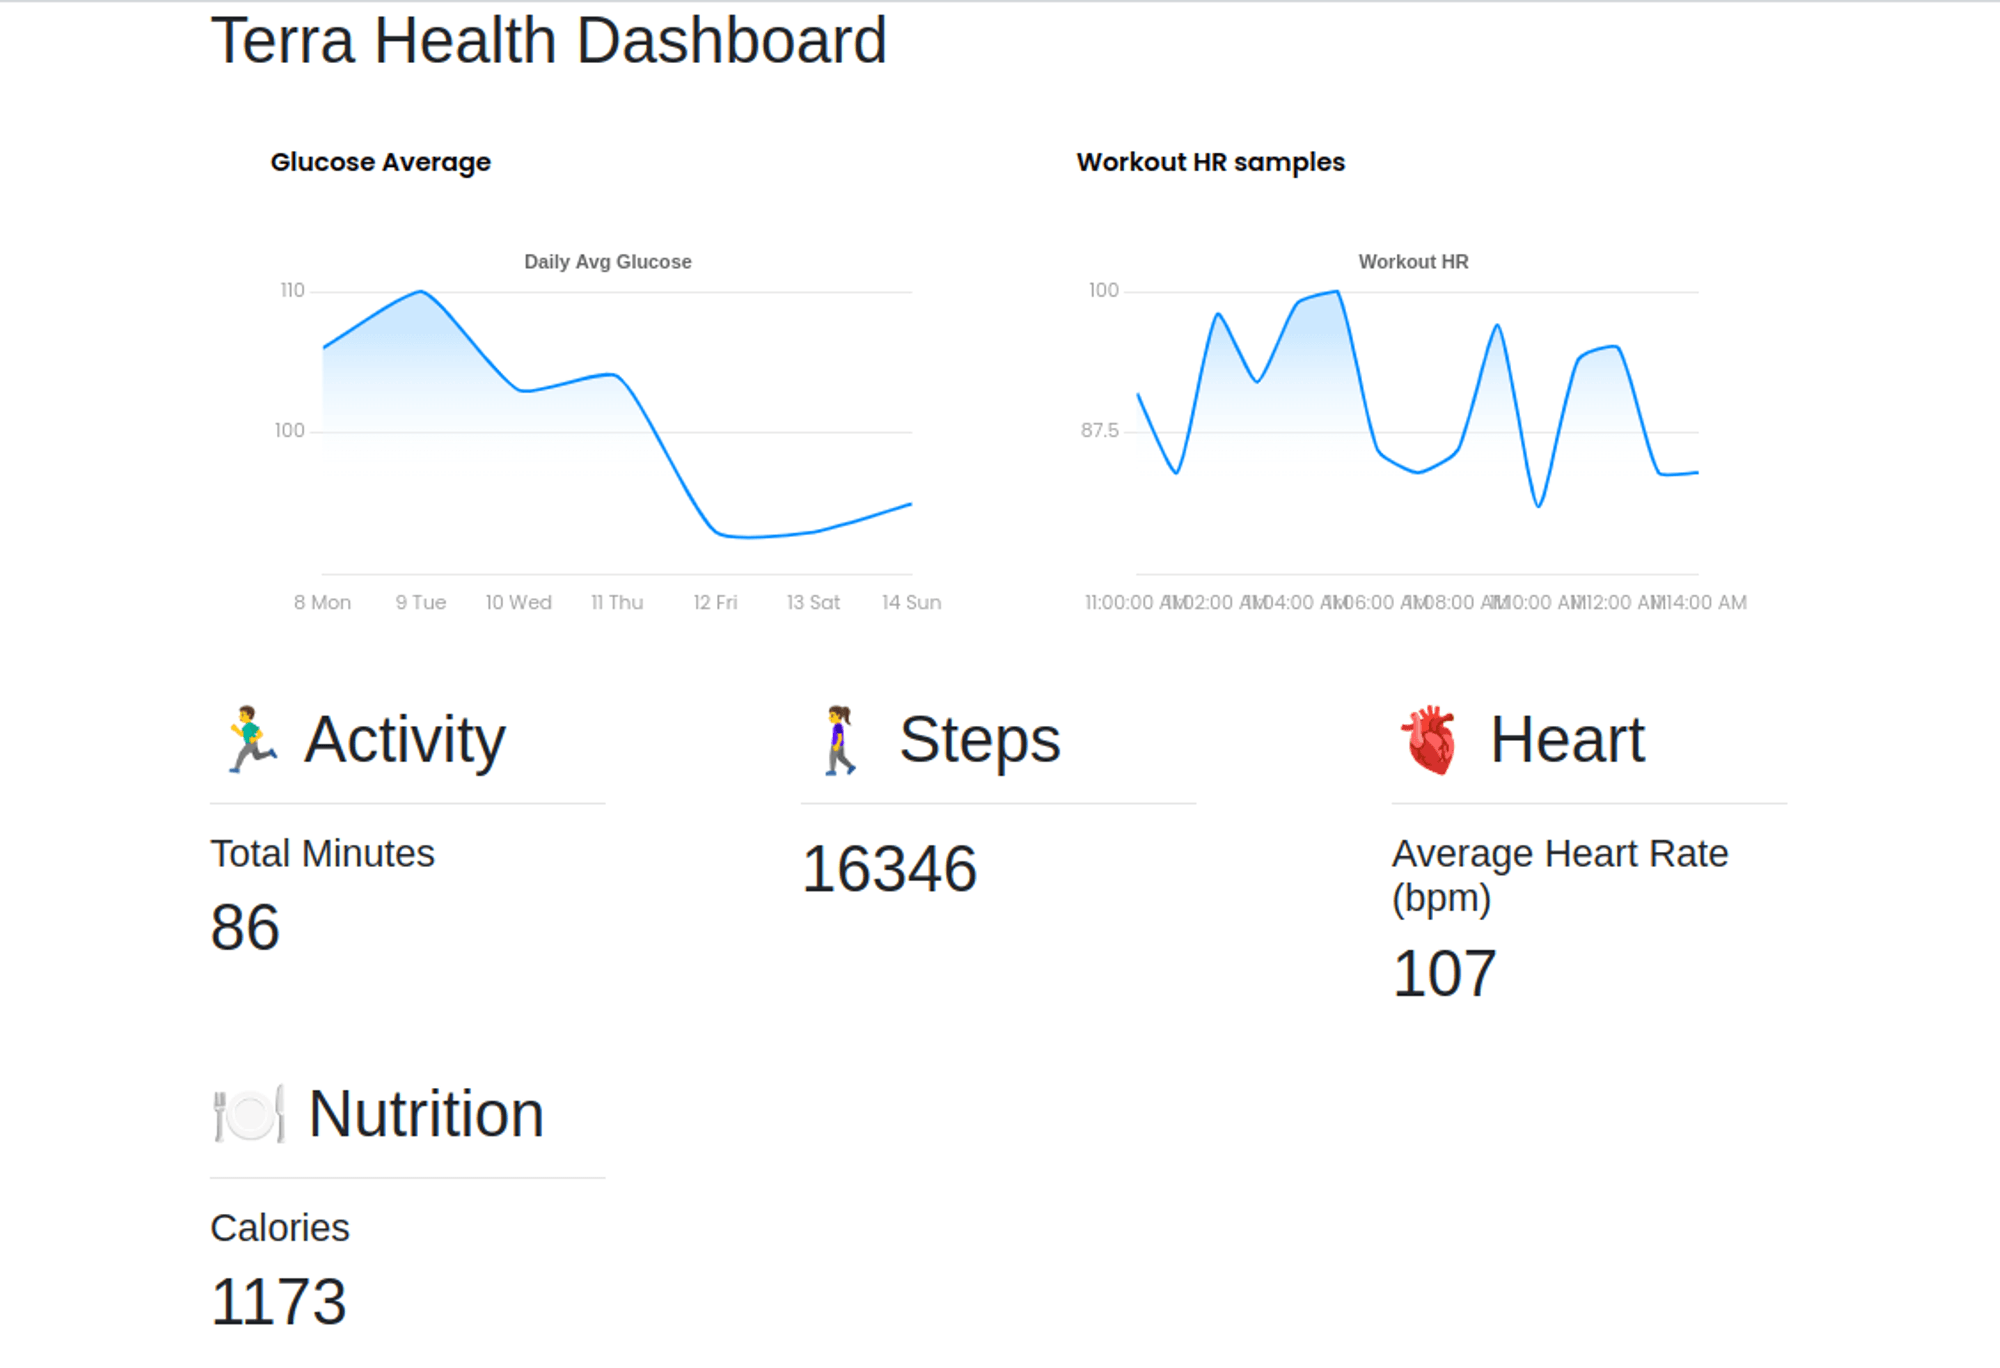
With the values properly rendered, you should now see the actual health values on your dashboard.
Make sure your Flask server is running, and use your browser to access your Ngrok Server URL. You should see a fully functional dashboard:
Conclusion
Congrats! You've learned how to use the Terra API to make a dashboard for your health data.
To learn more about the awesome things you can build with Terra, check out the following pages:


